
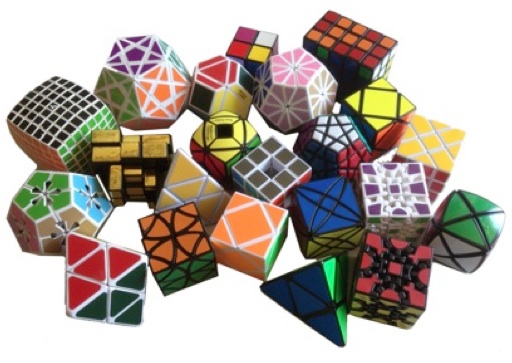
Rubik’s Cube is back! After years of relative quiet it is once again common to see people twisting away at their Cubes. There have also been some exciting new developments, such as complex solving methods, new Cube designs and streamlined ways of manipulating the Cube that allow experts to solve the Cube in under 10 seconds. And, on its return, the Cube has been accompanied by hundreds of related twisty puzzles demanding to be unscrambled.
You’re a mathematician, so chances are that at some point you've played around with Rubik’s Cube. How far did you get? Could you figure out the whole thing? Or did you just manage to fix one layer, but then were not able to progress any further?
If so then you're in the good company of millions of others. You may then have gone on to "solve" the Cube by following one of the ready-made recipes available in books and on the internet. But, of course, this really is "solving", not solving, and it's not nearly as satisfying as the real thing. Moreover, you've possibly now forgotten almost everything about that recipe, leaving you with little chance of unscrambling the next Cube that confronts you.
What I want to do here is to share with you a simple but very powerful trick. Provided you know how to solve the first layer, this trick will allow you to derive your very own recipes for solving the Cube, and for many other twisty puzzles. And, even if you haven't yet solved that first layer, you'll be able to understand how the trick works and will be able to remember and apply it: ideal for the next time you're stranded on a desert island with only a Rubik's Cube to keep you occupied.
This probably all sounds too good to be true, but the trick is easy to learn and it really works. It's well-known and used by many genuine twisty puzzle solvers. And it's not that these experts are attempting to protect a treasured trade secret. It seems more that the trick tends to get lost in the fiddly details of particular solutions.
I’d like to stress that the purpose of this article is to give you a good chance of "doing it all by yourself", any time you choose and with no help from others. However, actually finding a solution to the Cube does not come for free. You'll still need to do some work to put the trick into practice: perhaps about the same amount of work as it took to figure out how that first layer of the Cube works.

Cube experts refer to useful sequences of twists as algorithms (or algs). Finding algorithms that only move a few of the Cube’s pieces is exactly the purpose of the trick we are about to discuss.
Consider the following practice Cube, where all the stickers below the top layer have been removed.

You already know how to solve a scrambled version of this practice Cube, since you can solve the top layer of the full Cube. Now, your first challenge is to flip just one of the top edges of the simplified Cube: you can use any algorithm you want, but the end result is one top edge flipped, with the rest of the top layer unchanged. There are many different algorithms that will do this and you would have discovered and employed such algorithms when solving the top layer of the Cube.
There's no need to go into details here: we'll just assume you've found YOUR ALG, or you can consider it your homework for later.
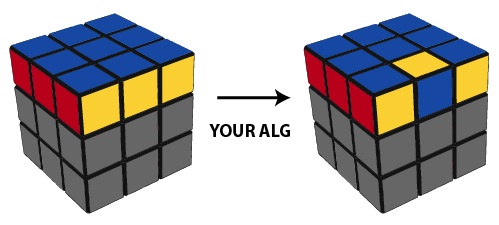
Let's now consider the effect of YOUR ALG on a full, non-practice Cube. YOUR ALG will leave the top layer unchanged, except for flipping that one edge (the exact purpose of the algorithm), AND it will mess up some of the previously grayed out lower layers. Of course, the way the lower layers are messed up will depend upon the specifics of YOUR ALG, but that doesn't matter. For MY ALG, the Cube will end up as in the picture below.

It is also very easy to restore the Cube: simply run YOUR ALG IN REVERSE. That is, the effect of the reverse algorithm is to flip that one piece, leave the top layer otherwise unchanged, AND restore the lower layers.
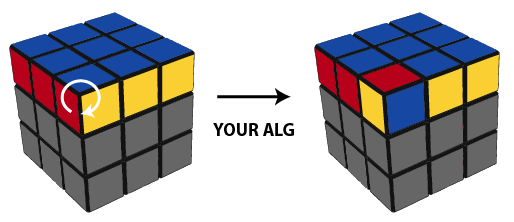
Now here comes the miracle. Instead of immediately performing YOUR ALG IN REVERSE, first rotate the top layer a quarter turn:

Only after this quarter turn do you perform YOUR ALG IN REVERSE. What is the effect? Since rotating the top layer has no effect on the lower layers, the reverse move will still restore the lower layers. And, in the top layer just one more edge gets flipped, with the rest left unchanged.

Then, rotating back the quarter turn the result will be a solved Cube with exactly two flipped edges.

So, in summary, we find that the combination your alg - 1/4 twist - your alg in reverse - reverse 1/4 twist leaves the whole Cube unchanged except for flipping two of the top edges.
That’s it! I hope you are impressed. However, in case you’re not, let’s stop to consider what we’ve just achieved. We’ve found an extremely simple method that allows anybody with some basic Cube skills to design, by themselves, a very powerful algorithm that otherwise would be completely out of their reach, an algorithm that allows them to miraculously manipulate any two adjacent edge pieces in isolation. In fact, this algorithm is all you need to correct the orientations of all the edges in a scrambled Cube.
Also, once you’ve designed your miracle algorithm it is clear why it does what it does. You really know what you are doing when you use your algorithm, unlike the vast majority of other “solvers”, including many champion speed solvers who can “do” the Cube in under 10 seconds.
A simple but very powerful trick? You bet! But that’s only the beginning. Using the same basic idea you can produce three more miracle algorithms of the form your alg - 1/4 twist - your alg in reverse - reverse 1/4 twist: one allows you to twist corner pieces; another allows you to move edges; and the final miracle algorithm allows you to move corners. Together, your four miracle algorithms (patent pending) are all you need to solve the Cube.
Did I promise too much? One simple trick (and a little bit of brain and perseverance) is really all you need to conquer the Cube. So, if you're up for the challenge try to figure out the rest for yourself. The less you read, the more your solution will genuinely be your own. However, if you'd like a few more hints, please continue reading, until you think you're ready to start puzzling on your own. In any case, DO NOT CONTINUE READING UNTIL you've really understood how to construct your miracle YOUR EDGE FLIP MOVE as described above, and why it does what it does.
Here's a clip in which we go through the individual steps again. Spoiler alert: Rosebud is a sled. Also, in the clip below we reveal OUR ALG for flipping one edge.
You're still here? Okay, then let's go on to the remaining three miracle moves together.
YOUR ALG - 1/4 twist - YOUR ALG IN REVERSE - reverse 1/4 twist
is the desired YOUR CORNER TWIST ALG. So,
gives


Then, as before,
YOUR ALG - 1/4 twist - YOUR ALG IN REVERSE - 1/4 twist in reverse
is the sought after YOUR EDGE CYCLE ALG. This miracle move cycles three of the top edges as pictured:

Can you see why the two swaps produced by YOUR ALG and its reverse result in a cycle of three edges?
The clip below goes through the individual steps again, and also discusses the practical aspect of recording YOUR ALGS.

This then translates into

If you've gotten this far then you should be able to figure out how to create YOUR MIRACLE ALGS from scratch whenever you need them, and you shouldn't have too much difficulty in using them to solve a scrambled Cube.
Step 1. Fix the red layer.
Step 2. Move the remaining corners to their correct positions.
This takes a bit of work. The four remaining corners are all contained in the orange layer opposite the solved red layer, so we'll call them the orange corners. To begin, just pick one of the orange corners and move it into place by rotating the orange layer. The remaining three corners can then be put in their places by using OUR CORNER CYCLE ALG, but there are different cases to consider.
If the remaining three corners are all out of place then they can be cycled into place using OUR CORNER CYCLE ALG once or twice.
If exactly two orange corners are in place then there are two subcases to consider. First, if the two correctly placed corners are next to each other then a 1/4 twist of the orange layer will result in just one correctly placed corner; we can then proceed as above. Otherwise, if the two correctly placed corners are diagonally opposite, then applying OUR CORNER CYCLE ALG to any three orange corners, possibly followed by a turn of the orange layer, will result in just one orange corner being correctly placed; so, again, we can proceed as above.
Step 3. Fix the orientations of all the corners. This requires a few applications of OUR CORNER TWIST ALG.
Step 4. Move the remaining edges to their correct positions. This requires a few applications of OUR EDGE CYCLE ALG.
Step 5. Fix the orientations of all the edges, and so complete the unscrambling of the Cube. This requires a few applications of OUR EDGE FLIP ALG.
1. Optimal Moves: Recall that we began by finding YOUR ALG that flips just one edge of the practice Cube. What if YOUR ALG turned out to be very special and didn't mess up the lower layers at all? Then YOUR ALG would be all we'd need to adjust the edge orientations one at a time; we wouldn't have to fuss with flipping edges two at a time. Unfortunately, it turns out to be impossible to flip just one edge of a Cube and not mess up something else. The best we can hope for is to flip two edges without disturbing anything else, which is exactly what YOUR EDGE FLIP ALG achieves.
If you accept the above as true, then it is also clear why we will always be able to orient all the edges using YOUR EDGE FLIP ALG once everything else about the Cube has been fixed. Just move around the Cube, fixing one edge orientation at a time, and disturbing one new edge still waiting to be fixed. Eventually, you'll have correctly oriented all but the final edge: however, since it is impossible to have just one disoriented edge, this final edge must also be oriented correctly.
Similarly, it'd be great to have special versions of all YOUR ALGS that leave the bottom layers of the Cube undisturbed, and similarly none of these special versions are possible. The four miracle moves we have described disturb the smallest number of edges or corners. If you'd like to find out why this is so, then Google "parity Rubik's Cube". Also, our online lecture linked below gives an introduction to the way parity appears in puzzles such as Rubik's Cube.
2. Commutators: All the miracle moves we have constructed have the form
YOUR ALG - 1/4 twist - YOUR ALG IN REVERSE - reverse 1/4 twist
In fancier symbolism, these miracle moves are of the form
ABA-1B-1.
In mathematics such a combination move is called a commutator. As we remarked this basic trick is very old and very well known by puzzle experts. Now that you're aware of the trick, you'll notice its constant appearance in puzzle solutions.
Examples of other twisty puzzles that can be readily solved with a little thought and a few miracle moves are the tetrahedron-shaped Pyraminx puzzle and the dodecahedron-shaped Megaminx puzzle.

For example, the following diagrams highlight a layer in the Megaminx puzzle and summarize the construction of YOUR EDGE FLIP ALG for this puzzle.

With some other twisty puzzles, miracle moves of the type we've described may not suffice to give you a full solution. However, they'll usually take you a fair way towards a solution.
3. Further watching: Here is a recording of our 2010 public lecture at the Melbourne Museum, entitled Rubik's Cube: Solved, once and for all!!, on Rubik's Cube and the 14-15 puzzle. The lecture goes through lots of the basic maths of these two famous puzzles, and also features an appearance by Feliks Zemdegs, the current world record holder in speedsolving the Cube.
Option-click to download in FLV format (95.42MB).
4. Further reading. If you want to know about any aspects of "Cubing" there is no shortage of material to be found on the internet: learn to speedsolve a Cube, learn to solve it blindfolded, and so on. For years my favorite website for twisty puzzles has been Jaap's incredibly comprehensive puzzle page. In particular, Jaap has a maths section in which everything we've talked about and much more is introduced in a clear and concise manner. One of the most accessible books on the Cube and its multilayer variants is The Cube: The Ultimate Guide to the World's Bestselling Puzzle, Secrets, Stories, Solutions by the puzzle masters Jerry Slocum, David Singmaster, Wei-Hwa Huang, Dieter Gebhardt, and Geert Hellings.
Except that I should probably add at least one pointer to another place where the trick that I am trying to push here is explained. As I said in the introduction, most cube experts will be aware of the trick but it usually gets lost in the details of particular solutions. Anyway, here is a link to an explanation by Alan Hensel.
